How to hang wallpaper step by step: a complete guide to achieving a good result
If hanging wallpaper used to be a complicated job, nowadays it's much simpler. Most modern wallpapers are designed for quick and clean installation. With a little patience and by following a few basic steps, anyone can achieve a great finish.
This guide explains how to hang wallpaper step by step. You'll see how to prepare the wall, what tools you need, how to calculate the number of rolls required, and how to adhere each strip to the wall so that it's straight, the pattern matches, and there are no bubbles.
These tips will help you avoid the most common mistakes, especially if it's your first time wallpapering a room.
Here's an introductory video courtesy of Hohenberger, one of our wallpaper brands. You can take a look at it before continuing to read.
Choose the right wallpaper
Before thinking about installation, it is advisable to choose a wallpaper suitable for the room and the type of wall.
Currently, most manufacturers work with non-woven papers, also known as TNT. They are easier to install because the adhesive is often applied directly to the wall. Furthermore, they hardly warp and allow the strip to move slightly during placement to adjust it better.
Another very common option is the vinyl wallpaperIt has a protective vinyl surface layer, which makes it more resistant to moisture and much easier to clean. For this reason, it is often used in high-traffic areas, kitchens, bathrooms (but well-ventilated and away from direct water jets), or children's rooms.
There are also papers where you have to apply the glue directly to the paper and wait a few minutes before applying it. This process requires a little more care.
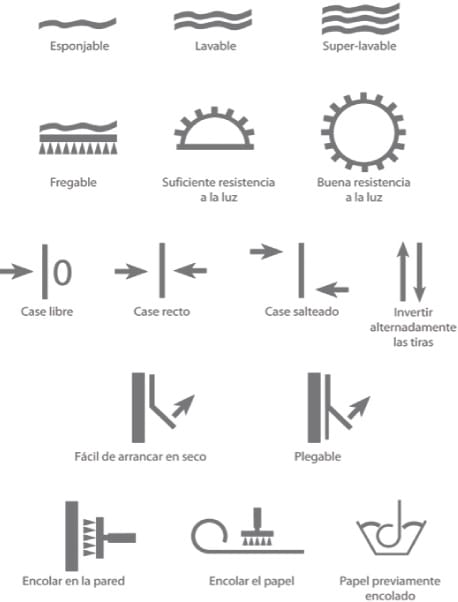
Whatever type of wallpaper you choose, it's always worth checking the manufacturer's instructions. These are indicated on the label of each roll. If you buy it online, we clearly state them on each wallpaper's product page on our website.
In addition, some manufacturers use specific glues or recommend specific tools to achieve a better finish.
Which design is easier to install?
If you've never hung wallpaper before, starting with a simple design can make the job much easier.
Plain papers, textured papers, or papers with small patterns are usually the easiest. They require minimal pattern matching between strips. And if you make a mistake, it will be barely noticeable. These are what we call "free-match" papers.
In contrast, designs with large patterns, bold stripes, geometric designs, or murals require a perfect match of the print. This takes more time and also generates more paper waste.
If the wallpaper has a repeating pattern, you'll need a little more material to properly align each strip. This is an important detail to consider when calculating the number of rolls needed.


Check that all rolls belong to the same batch or dye lot
Before opening the rolls, check that they all have the same batch number.
Although the design is exactly the same, there may be slight color variations between different batches (dyes). These are barely noticeable to the naked eye, but they can become apparent once the wallpaper is applied.
Performing this check only takes a few seconds and avoids surprises when the wall is already finished.
We always recommend not skimping when ordering toilet paper. It's better to have too much than to run out and then not be able to find a roll of the same color.
It's a minor thing, but from experience we can tell you that it's something that can ruin the installation if for whatever reason we fall short.
Prepare the wall before you begin
Proper wall preparation is almost as important as the wallpaper itself. There's little point in buying high-quality wallpaper if the surface isn't in good condition.
The wall must be clean, dry, smooth, and firm. If there is dust, paint residue, or dirt, the adhesive may not stick properly.
Start by removing pictures, nails, dowels, and any other protruding items.
Then thoroughly clean the entire surface with a brush or a slightly damp cloth to remove accumulated dust.
If the wall has holes or small cracks, fill them with filler. Once it's completely dry, sand the area until it's smooth with the rest of the wall.
It's also a good idea to check for any dampness problems. If you see dark stains, mold, or peeling paint, you need to address the source of the dampness first. Simply putting wallpaper over it will only cause the problem to reappear.
Is it necessary to apply a primer?
Not always, but in many cases it is advisable.
If the wall is highly absorbent, has very porous paint, or shows different shades after being repaired, a primer helps to even out the surface.
It also facilitates the sliding of the paper during installation and improves the adhesion of the glue.
On new plaster or drywall walls, it is almost always worth applying a primer before wallpapering.
Can you put wallpaper over paint?
Yes, as long as the paint is in good condition. If the paint is well adhered, smooth, and not chipped, you can apply the paper directly after cleaning the surface.
If there are areas where the paint comes off easily, you will first have to scrape them, repair the wall and make it completely uniform.

Remove or cover the textured paint before putting up wallpaper
One of the most common questions is whether you can put wallpaper over textured walls.
Although technically possible when the relief is very fine, it is best to remove it beforehand.
Wallpaper copies virtually everything underneath it. If the wall has a pronounced texture, that pattern will still be visible once the wallpaper is hung.
In addition, the joints between strips will be much more visible and it will be more difficult to achieve a clean finish.
For this reason, whenever the textured paint is pronounced, it is advisable to smooth the wall before starting.
If you're unsure of the best way to do this, you can complete your assessment by consulting our [link/reference]. Guide on how to cover textured walls before putting up wallpaper.
Can you put wallpaper over tiles?

If you want to renovate a bathroom or kitchen without construction work, you can also cover the tiles with wallpaper. The most important thing is to prepare the surface properly.
First, fill the joints with leveling putty, sand until the wall is smooth, clean off any dust, and apply a primer to improve adhesion.
Then all that remains is to put up vinyl wallpaper, which is much more resistant to moisture and easy to clean.
If you want to see the process in more detail, check out our guide on How to cover tiles with wallpaper.
Remove the old wallpaper
If the wall already has old wallpaper, it's best to remove it before putting up new wallpaper.evo.
In some cases the old paper may seem well glued, but over time the moisture from the new glue can cause it to eventually peel off.
The safest thing to do is start from a corner and see if it comes out easily.
Many modern non-woven papers can be removed virtually dry.
In contrast, traditional papers usually require warm water or a specific product to soften the glue.
After removing all the paper, clean off any adhesive residue and allow the wall to dry completely.
Take this opportunity to repair any small imperfections that may have been revealed. A smooth surface will make the final result much better.
Before you begin, prepare all the materials.
Having all the tools on hand prevents interruptions during installation.
You'll usually need a roller to apply the glue, a brush for the corners, a level, a metroa pencil, a metal ruler, a cutter with new blades, a brush for smoothing the paper, a roller for the joints, a clean sponge and a bucket for preparing the glue.
It's also advisable to protect the floor with plastic or cardboard before starting. This will allow you to work more comfortably and prevent glue stains.
How many rolls of wallpaper do you need?
Before opening the first roll, it's a good idea to check that you've bought enough toilet paper. Running out once you've started can be a problem, especially if the manufacturer changes batches.
If you buy the wallpaper from our store, you can use the roll calculator found on each product page. Simply enter your wall measurements and you'll get a very accurate estimate.
If you prefer to do the calculation yourself, First, measure the width of the wall. Then divide that measurement by the width of the roll to find out how many strips you will need.
The next step is to divide the length of the roll by the height of the wall. This will tell you how many complete strips you can get from each roll.
If the paper has a pattern that needs to be matched, always add a safety margin. In these cases, slightly more material is wasted because each strip must align with the previous one.
If you're unsure between two quantities, it's always better to buy one roll extra.If you ultimately don't need it, you can keep it for future repairs.
If you decide to buy through our website, we offer a roll calculator in the product description. You can also send us a message and we'll help you calculate it.
How to prepare the tail
The adhesive must be suitable for the type of paper you are using. Many manufacturers recommend specific adhesives for non-woven or vinyl wallpapers.
If using powdered glue, prepare only the amount you will need. Follow the proportions indicated by the manufacturer and stir well until all lumps are gone.
Then let the mixture rest for a few minutes before using it. This will allow it to reach the right consistency.
If you are using ready-made glue, simply stir it lightly before starting.
Don't use glue that's too runny. And don't use glue that's too thick either. It should spread easily with a roller without forming clumps.

How to hang wallpaper step by step
It's time to begin. Work calmly and place one strip at a time. The first one is the most important because it will serve as a reference for all the others.
1. Draw a completely vertical line
Many people start from a corner of the room. However, corners are almost never perfectly straight.
The best thing to do is use a level or a laser level and mark a vertical line a few centimeters away.metros from the corner. That line will be the guide for placing the first strip.
If the first strip is straight, it will be much easier for the rest to be as well.
2. Cut the first strip
Measure the height of the wall and cut the first strip leaving about five centimetersmetromargins both above and below.
That small excess will allow for a better fit of the paper and a clean cut once it is in place.
If the paper has a pattern, check before cutting that the next strip will fit correctly with the previous one.
3. Apply the glue
In non-woven wallpapers, the glue is applied directly to the wall.
Apply an even coat using a roller. In corners, around the ceiling, and along the baseboard, a brush is more convenient.
Apply paste only to the area needed for one or two strips. If you cover the entire wall at once, some of the paste may start to dry before you hang the wallpaper.
4. Place the first strip
Position the paper from the top of the wall and align it with the vertical line you have marked.
Do not press immediately. First, check that the strip is perfectly aligned.
When you are sure, start smoothing from the center outwards.
Do it slowly to expel the air and prevent bubbles from forming.
5. Smooth the paper properly
Use a wallpapering brush or a spatula designed for this job.
Always start from the center of the strip and move the air towards the edges.
Avoid sudden movements or excessive pressure. Some delicate papers can be damaged by too much pressure.
If a bubble appears while the glue is still fresh, gently lift that area and replace the paper.
6. Trim off the excess
Once the strip is smoothed, trim off the excess paper from the ceiling and baseboard.
Use a metal ruler to support the cutter and achieve a perfectly straight cut.
Change the blade when you notice it stops cutting easily. A worn blade can tear the paper.
7. Place the next strip
The second strip should be placed right next to the first, joining the edges without overlapping them.
If the paper has a pattern, take a few seconds to properly match the pattern before smoothing.
It's better to invest a little more time in this step than to discover later that the drawing doesn't match.
8. Check the joints
When two strips are perfectly joined, run a small roller over the joint.
Do it gently. The goal is to improve the contact between the paper and the wall, not to flatten the design's relief.
If a little glue comes out, remove it immediately.
9. Clean up any remaining glue
While the glue is still wet, it's very easy to remove any residue.
Use a clean, slightly damp sponge and gently wipe the surface.
Do not rub vigorously. Some finishes may be damaged if cleaned aggressively.
How to avoid bubbles and wrinkles
Bubbles usually appear when air is trapped behind the paper or when there is insufficient glue in some area.
To avoid this, always smooth from the center outwards and check that the entire surface has enough glue before placing the strip.
If you notice a bubble while the paper can still move, carefully lift that part and smooth it out again.
It's also best to work in a draft-free room. If the glue dries too quickly, it will be more difficult to correct small imperfections.
How long does it take for wallpaper to dry?
Although the paper is attached from the first moment, the glue needs several hours to dry completely.
It is normal to leave the room undisturbed for at least a day.
Avoid opening windows wide or using heaters to speed up drying. Drying too quickly can cause some seals to open.
The best thing to do is to maintain a comfortable temperature and let the glue dry naturally.